Creating a PIC32 project from scratch using the Microchip MPLAB® IDE
This document summarizes the steps when creating a new project for the Microchip PIC32 family of microcontrollers, using the MPLAB® IDE. The specific example illustrated in this checklist is the driver for the DOGM-163 LCD display.
Contents
- Preliminaries
- Adding source code
- Setting build options
- Building the project
- Simulating the executable object
- Programming the PIC32 chip
- Creating a shared library of the project
- Using the shared library in another project
- Organization of the folders in the IDE Project Browser (Files tab)
- References
- About this document
I. Preliminaries
- Save and close any open projects.
- Assuming that your projects are kept at
C:\Projects\, create a new project folderC:\Projects\dogm16x\, in a terminal window typically by
here assuming that Cygwin is used as terminal emulator.$ cd /cygdrive/c/Projects/; mkdir dogm16x; - Open the Project Wizard from the menu bar by Project->Project Wizard.
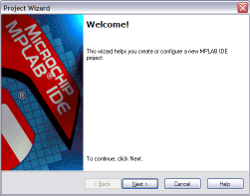
-
In the Project Wizard Welcome window, simply click Next.
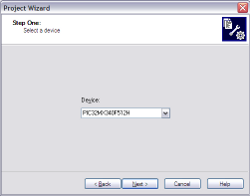
-
In the Project Wizard Step One window, select PIC32MX340F512H
(as, for example, for the PIC32 processor surface mounted on the Olimex
prototyping board as used in the display
driver project) in the Device drop-down list and click
Next to continue.
-
In the Project Wizard Step Two window, select the Microchip
PIC32 C-Compiler Toolsuite in the Active Toolsuite drop-down list.
In the Toolsuite Contents list, select MPLAB® C32 C-Compiler
(pic32-gcc.exe) and click Next to continue.

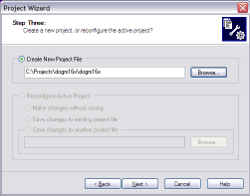
-
In the Project Wizard Step Three window, select the
Create New Project
File checkbox, browse to the currently created project folder
C:\Projects\dogm16x\ and type in dogm16x as the name for the
new project.
Click Save, and when returned to the main window, click Next to continue.
-
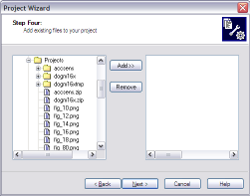
In the Project Wizard Step Four window, we may skip this step
as we so far have not created any source files to be added to the project.
Hence, just click Next to continue.
-
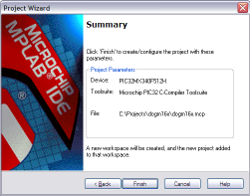
In the Project Wizard Summary window, the project parameters are
now displayed. Click Finish to create the new project. A project
and an associated workspace has now been created.
- A project file dogm16x.mcp and workspace description dogm16x.mcw has now been created and added to the MPLAB® Integrated Development Environment (IDE). Naturally, this project has no source files yet so this is the next task.
II. Adding source code
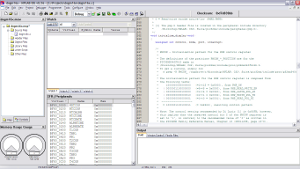
- We will now add a C source file to the project. Select File->New from the menu bar to create a new source file. This adds a so far unnamed text file to the IDE window.
- Add the following code to the so far unnamed file: dogm16x.c
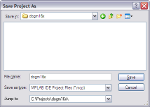
-
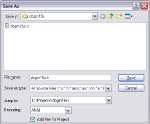
Save the new file by File->Save As from the menu bar. Type
dogm16x.c for the File name, select ANSI for the text encoding and
check the Add File To Project checkbox. Do not worry if you
miss this final step, as any files always can be added later on by
right-clicking them in the IDE and selecting
Add To Project.
- In similar to the added C code, now also add a corresponding header file. Select File->New from the menu bar to create a new source file. Again, this adds a so far unnamed text file to the IDE window.
- Add the following code to the so far unnamed file: dogm16x.h
- Save the new file by File->Save As from the menu bar. Type dogm16x.h for the File name, select ANSI for the text encoding and check the Add File To Project checkbox. Do not worry if you miss this final step, as any files always can be added later on by rightclicking them in the IDE and selecting Add To Project.
- Save the entire workspace by selecting File->Save Workspace from the menu bar.
III. Setting build options
- From the main menu, select Project->Build Options...->Project.
-
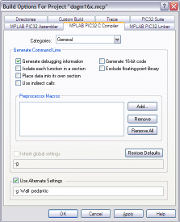
In the Build Options For Project window, select the MPLAB® PIC32
C Compiler tab, check the Use Alternate Settings checkbox and
add "-Wall -pedantic" to the existing "-g" option.
Click OK to save the modified options.
- (See http://gcc.gnu.org/onlinedocs/gcc/Standards.html on the significance of adding these options.)
IV. Building the project
The project is built either by selecting Project->Build All from the menu bar or by simply pressing the Build All button in the GUI. This operation will perform essentially the two tasks of compiling and linking, in this order.
In the compilation, the instructions in the source code are translated into machine code, saved in an object code file (.o), which is understood by the PIC processor. If the project contains several source files, the compilation is applied to each one of them. Most of the code generation is completed by the compilation, however, the object code files are not yet executable as all the specific memory addresses for storage of variables and functions are still undefined. This is to some extent reflected in the term "relocatable code object" which equivalently may be applied to the generated object code files.
In the linking, proper positions in the memory space in the actual hardware architecture is found for each variable and function. Any precompiler object code files or standard library functions are also added at the linking step. Among the set of output files produced by the linker, the actual executable binary file (.hex) for the PIC microprocessor is the equivalent of the regular executables (.exe) for standard desktop computers.
However, after having built the project from scratch, notice that the actual programming of the chip (that is to say, the loading of the flash memory of the PIC microprocessor with the generated .hex code) and execution of the code on the PIC32 still may not accessible, as we yet have not chosen any Debugger (via Debugger->Select Tool) or Programmer (via Programmer->Select Programmer).
V. Simulating the executable object
-
Two possibilities:
- If you are using the ICD3 in-line debugger and programmer, select Debugger->Select Tool->MPLAB® ICD3 from the menu bar to choose and activate the ICD3 as the main debugging tool for the project.
- Otherwise, for example if you are using the PIC32 Starter Kit (which already has a hardware debugger mounted directly in line with the USB connection to the PIC32 processor, instead select Debugger->Select Tool->MPLAB® SIM from the menu bar to choose and activate the software simulator as the main debugging tool for the project.
-
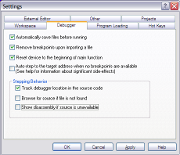
In order to configure the simulator, select Configure->Settings
from the menu bar and select the Debugger tab in the
Settings window.
Check (enable) the following checkboxes:
- Automatically save files before running
- Remove breakpoints upon importing a file
- Reset device to the beginnning of main function
- Browse for source if file is not found
- Show disassembly if source is unavailable
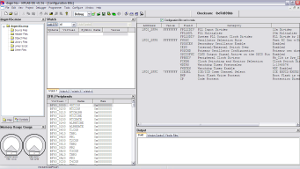
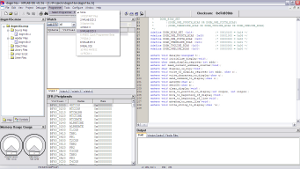
- To enable the monitoring of the state of the microcontroller during execution, select View->Watch from the menu bar. This activates the Watch window in the MPLAB® IDE.
-
In order to define which properties to watch during execution, select the
parameters or ports of interest. In the case of the
driver for the DOGM16x
class of LCD displays, we are specifically interested in accessing the
following parameters:
- PMCON (the initialization pattern for the PMP control register),
- PMMODE (the initialization pattern for the PMP mode register),
- PMDOUT (the PMP output byte to the LCD), and
- PMSTAT.
- Press the simulator reset button in the Debug Toolbar or select Debugger->Reset from the menu bar. The contents of the watched registers in the Watch window should now display all zeroes. Also notice that after the reset, a green arrow points at the main() function in the source code window. This indicates the code block which will be executed next.
- In order to step through the code in simulated mode, now use the Step Into or Step Over buttons in the Debug Toolbar. Note: It may at this stage be convenient to tile the source code and Watch windows in the IDE to enable a simultaneous view of the currently executed code block and the state of the watched parameters.
VI. Programming the PIC32 chip
-
Again, two possibilities:
-
If you are using the ICD3 in-line
debugger and programmer, select
Programmer->Select Programmer->MPLAB® ICD3 from the menu bar to
choose and activate the ICD3 as the main debugging tool for the project.
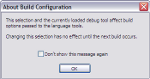
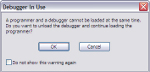
You will at this stage most likely get a dialog window which asks for
permission to continue loading the programmer, as a programmer and a
debugger cannot be loaded simultaneously at the same time.
Click OK to continue.

- Otherwise, for example if you are using the PIC32 Starter Kit, instead select Programmer->Select Programmer->Starter Kits.
-
If you are using the ICD3 in-line
debugger and programmer, select
Programmer->Select Programmer->MPLAB® ICD3 from the menu bar to
choose and activate the ICD3 as the main debugging tool for the project.
You will at this stage most likely get a dialog window which asks for
permission to continue loading the programmer, as a programmer and a
debugger cannot be loaded simultaneously at the same time.
Click OK to continue.
- Change build configuration from Debug to Release via the Project->Build Configuration menu (or by directly accessing the Build Configuration drop-box, if activated and visible in the MPLAB® IDE).
- As the dogm16x LCD driver relies on configuration bits (for timers and oscillator settings) set via #pragma statements early in the C code, we should be careful not to override these settings by any settings in the MPLAB® IDE. Hence, open the Configuration Bits window by the Configure->Configuration Bits... menu, and make sure to check the Configuration Bits set in code checkbox.
- Save the entire workspace by either File->Save Workspace or clicking the Save Workspace button (depicted as a floppy disk, anyone who remembers these?).
- If needed (that is to say, if any file has been altered since the simulation), rebuild the project either by selecting Project->Build All from the menu bar or by simply pressing the Build All button.
- Transfer the executable object (.hex) to the memory of the chip by either selecting Programmer->Program from the menu bar or simply by pressing the Program button in the Toolbar.
VII. Creating a shared library of the project
Having tested the code thoroughly, you will hopefully find it useful to include in other projects. This is easily done by compiling a shared library which easily can be included into other programs without the need of any cut-and-paste of code. In addition, the approach of using a shared library also simplifies the maintenance of future corrections or additions to the code.
The easiest way of compiling a shared library is to change the settings in the Build Options directly in the MPLAB® IDE.
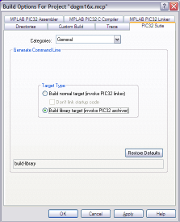
- Open Project -> Build Options... -> Project
-
In the PIC32 Suite tab, change the Target Type to
Build library target (invoke PIC32 archiver). Press OK.
This step is very important, as a library needs to be compiled with
"position independent code" which does not rely on any particular memory
locations in the processor.
(Ironically, the common abbreviation for "position independent code is
"PIC", making it hard to find PIC32-specific information on "PIC"; see
reference [5] for further information on this subject.)
- For a project involving a main() routine, that is to say code for compiling the project into a stand-alone hex image which can be loaded into the flash memory of the PIC32 processor, it is convenient to keep main() in a separate file (I suggest simply naming it 'main.c', see the corresponding example main.c of the LCD driver project ). This way, we are able to separate any auxiliary #include:s not specific to the driver routines, also separating the main() routine from any library that is compiled from the set of driver routines. As long as you keep the main() routine in a separate file, the MPLAB® IDE recognizes this and keeps main() out from the library, regardless of whether main.c is included in the project or not.
- Rebuild all by Project -> Build All (or press Ctrl-F10 or the Build All button in the MPLAB® IDE). In the console output logging the build, you should somewhere at the bottom of the text see a line like 'C:\Microchip\MPLAB C32 Suite\bin\pic32-ar.exe: creating dogm16x.a'
-
Verify that the library file dogm16x.a has been built in the project
directory. Copy this library file to the location where you keep your
shared libraries,
say /cygdrive/c/Microchip/MPLAB\ C32\ Suite/pic32mx/lib/
(being the regular directory
for PIC32 libraries, which by default is included in the search path by the
MPLAB® IDE).
Make sure that you name the copy of the library 'libdogm16x.a',
following the standard convention in C where the leading 'lib'
of any libraries are expected and subsequently automatically omitted by
the compiler:
cp dogm16x.a /Microchip/MPLAB\ C32\ Suite/pic32mx/lib/libdogm16x.a -
Also copy the corresponding header file, to the standard header location,
cp dogm16x.h /Microchip/MPLAB\ C32\ Suite/pic32mx/include/dogm16x.h -
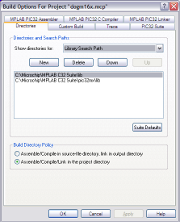
In case you wish to keep your own libraries at a separate location, then
make sure that you in each project that relies on the library include
the path to this directory by Project -> Build Options... -> Project
, select the Directories
tab and add the path to the directory containing your specific library.
-
Having generated the library, it is always a good idea to export the
corresponding Makefile as a future reference on the build.
To generate the Makefile corresponding to the building of the library,
right-click dogm16x.mcp in the Files tab in the project browser
and select Export Makefile. This leaves you with the corresponding
Makefile in the project directory.
In case you later on wish to change back to the normal
target build option (that is to say, generating a normal hex-image to be
loaded into the PIC procesor), it is convenient to rename the Makefile to,
say, Makefile_lib, to separate this from any later
Makefile exports.
In order to use this particular Makefile later on, simply execute
'make -f Makefile_lib' in a terminal window.
VIII. Using the shared library in another project
-
In order to use the routines available in the library
'libdogm16x.a' in another project, assuming that you have
already copied this library to the proper location as described in
the previous section, first add the line
#include <dogm16x.h>#include "dogm16x.h" -
Having included the header file of the driver, you may compile the code
into object files which reference the routines but do not explicitly
include their corresponding instructions. This task is taken care of by
the linker after compilation of the source code. However, in order to
build an executable binary (or hex-image, as the terminology for the
Microchip microcontrollers yield), you will need to tell the linker which
library to load the actual instructions from. You _may_ do this by editing
the Makefile, adding link options (typically '-Ldogm16x',
keeping in mind
that the linker automatically omits the leading 'lib' and the
trailing
'.a') and use this by running
make -F <Your modified Makefile> - Compile your project by the usual Project -> Build All (Ctrl-F10). Done!
IX. Organization of the folders in the IDE Project Browser (Files tab)
Source Files
The files containing source code, either in C (.c) or Assembler (.a) to be compiled into relocatable code objects (object files).
Header Files
This directory contains the names of the include files (.h). However, they are not processed directly by the compiler, but rather listed just as a convenient way to document the project dependencies.
Object Files
This directory contains any additional object files which will be linked together with the compiled object files to produce an executable object. Observe that the Object Files directory by default is NOT the destination directory for the relocatable code objects compiled from the source files.
Library Files
The list of library files will also be used during the linking to search for and extract any used standard library modules which contain functions.
Linker Files
Additional files which may be used to supply additional instructions to the linker, such as change of order and priorities of data and code sections as they are assembled into an executable object.
Other Files
Files included in the project but which do not fit any of the previous functions. Mostly, files included in this directory merely serves as a documentary function, such as README.txt or INSTALL.txt files, but also any relevant hardware documentation. This is a convenient place to keep any specific Makefiles exported as build references from the project.
X. References
[1] Lucio Di Jasio, Programming 32-bit Microcontrollers in C - Exploring the PIC32 (Elsevier Newnes, Amsterdam, 2008). ISBN 978-0-7506-8709-6. Web: http://www.exploringpic32.com
[2] Martin Bates, Interfacing PIC Microcontrollers - Embedded Design by Interactive Simulation (Elsevier Newnes, Amsterdam, 2006). ISBN 978-0-7506-8028-8. Web: http://www.picmicros.org.uk
[3] Tim Wilmshurst, "Designing Embedded Systems with PIC Microcontrollers - Principles and Applications" (Elsevier Newnes, Amsterdam, 2007). ISBN 978-0-7506-6755-5.
[4] John Morton, "The PIC Microcontroller - Your Personal Introductory Course", 3rd Edition (Elsevier Newnes, Amsterdam, 2007). ISBN 978-0-7506-6664-0.
[5] For an introduction on the concept of position-independent code (for which the here somewhat confusing acronym PIC commonly is used) for shared libraries, see Wikipedia: http://en.wikipedia.org/wiki/Position-independent_code
XI. About this document
The latest version of this document, along with the source code for the dogm16x driver, may be found at http://jonsson.eu/programs/ansic/dogm16x/